 | –≠–ª–µ–∫—Ç—Ä–æ–Ω–Ω—ã–π –∫–æ–º–ø–æ–Ω–µ–Ω—Ç: AD652 | –°–∫–∞—á–∞—Ç—å:  PDF PDF  ZIP ZIP |

FUNCTIONAL BLOCK DIAGRAM
REV. B
Information furnished by Analog Devices is believed to be accurate and
reliable. However, no responsibility is assumed by Analog Devices for its
use, nor for any infringements of patents or other rights of third parties
which may result from its use. No license is granted by implication or
otherwise under any patent or patent rights of Analog Devices.
a
Monolithic Synchronous
Voltage-to-Frequency Converter
AD652
One Technology Way, P.O. Box 9106, Norwood, MA 02062-9106, U.S.A.
Tel: 781/329-4700
World Wide Web Site: http://www.analog.com
Fax: 781/326-8703
© Analog Devices, Inc., 2000
FEATURES
Full-Scale Frequency (Up to 2 MHz) Set by External
System Clock
Extremely Low Linearity Error (0.005% max at 1 MHz
FS, 0.02% max at 2 MHz FS)
No Critical External Components Required
Accurate 5 V Reference Voltage
Low Drift (25 ppm/ C max)
Dual or Single Supply Operation
Voltage or Current Input
MIL-STD-883 Compliant Versions Available
PRODUCT DESCRIPTION
The AD652 Synchronous Voltage-to-Frequency Converter
(SVFC) is a powerful building block for precision analog-to-
digital conversion, offering typical nonlinearity of 0.002%
(0.005% maximum) at a 100 kHz output frequency. The inher-
ent monotonicity of the transfer function and wide range of
clock frequencies allows the conversion time and resolution to
be optimized for specific applications.
The AD652 uses a variation of the popular charge-balancing
technique to perform the conversion function. The AD652 uses
an external clock to define the full-scale output frequency,
rather than relying on the stability of an external capacitor. The
result is a more stable, more linear transfer function, with sig-
nificant application benefits in both single- and multichannel
systems.
Gain drift is minimized using a precision low drift reference and
low TC on-chip thin-film scaling resistors. Furthermore, the ini-
tial gain error is reduced to less than 0.5% by the use of
laser-wafer-trimming.
The analog and digital sections of the AD652 have been de-
signed to allow operation from a single-ended power source,
simplifying its use with isolated power supplies.
The AD652 is available in five performance grades. The 20-lead
PLCC packaged JP and KP grades are specified for operation
over the 0
∞C to +70∞C commercial temperature range. The
16-lead cerdip-packaged AQ and BQ grades are specified for
operation over the ≠40
∞C to +85∞C industrial temperature
range, and the AD652SQ is available for operation over the full
≠55
∞C to +125∞C extended temperature range.
PRODUCT HIGHLIGHTS
1. The use of an external clock to set the full-scale frequency
allows the AD652 to achieve linearity and stability far supe-
rior to other monolithic VFCs. By using the same clock to
drive the AD652 and (through a suitable divider) also set the
counting period, conversion accuracy is maintained indepen-
dent of variations in clock frequency.
2. The AD652 Synchronous VFC requires only a single external
component (a noncritical integrator capacitor) for operation.
3. The AD652 includes a buffered, accurate 5 V reference
which is available to the user.
4. The clock input of the AD652 is TTL and CMOS compat-
ible and can also be driven by sources referred to the negative
power supply. The flexible open-collector output stage pro-
vides sufficient current sinking capability for TTL and CMOS
logic, as well as for optical couplers and pulse transformers.
A capacitor-programmable one-shot is provided for selection
of optimum output pulse width for power reduction.
5. The AD652 can also be configured for use as a synchronous
F/V converter for isolated analog signal transmission.
6. The AD652 is available in versions compliant with MIL-
STD-883. Refer to the Analog Devices Military Products
Databook or current AD652/883B data sheet for detailed
specifications.

AD652≠SPECIFICATIONS
(typical @ T
A
= +25 C, V
S
= 15 V, unless otherwise noted)
AD652JP/AQ/SQ
AD652KP/BQ
Parameter
Min
Typ
Max
Min
Typ
Max
Units
VOLTAGE-TO-FREQUENCY MODE
Gain Error
f
CLOCK
= 200 kHz
±0.5
±1
±0.25
±0.5
%
f
CLOCK
= 1 MHz
±0.5
1
±0.25
0.5
%
f
CLOCK
= 4 MHz
±0.5
1.5
±0.25
0.75
%
Gain Temperature Coefficient
f
CLOCK
= 200 kHz
±25
±50
±15
±25
ppm/
∞C
f
CLOCK
= 1 MHz
±25
50
±15
25
ppm/
∞C
±10
50
±10
30
ppm/
∞C
1
f
CLOCK
= 4 MHz
±25
75
±15
50
ppm/
∞C
Power Supply Rejection Ratio
0.001
0.01
0.001
0.01
%/V
Linearity Error
f
CLOCK
= 200 kHz
±0.002
±0.02
±0.002
±0.005
%
f
CLOCK
= 1 MHz
±0.002
0.02
±0.002
0.005
%
f
CLOCK
= 2 MHz
±0.01
±0.02
±0.002
±0.005
%
f
CLOCK
= 4 MHz
±0.02
0.05
±0.01
0.02
%
Offset (Transfer Function, RTI)
±1
3
±1
2
mV
Offset Temperature Coefficient
±10
50
±10
25
µV/∞C
Response Time
One Period of New Output Frequency Plus One Clock Period.
FREQUENCY-TO-VOLTAGE MODE
Gain Error
f
IN
= 100 kHz FS
±0.5
±1
±0.25
±0.5
%
Linearity Error
f
IN
= 100 kHz FS
±0.002
±0.02
±0.002
±0.01
%
INPUT RESISTORS
Cerdip (Figure 1a)(0 to +10 V FS Range)
19.8
20
20.2
19.8
20
20.2
k
PLCC (Figure lb)
Pin 8 to Pin 7
9.9
10
10.1
9.9
10
10.1
k
Pin 7 to Pin 5 (0 V to +5 V FS Range)
9.9
10
10.1
9.9
10
10.1
k
Pin 8 to Pin 5 (0 V to +10 V FS Range)
19.8
20
20.2
19.8
20
20.2
k
Pin 9 to Pin 5 (0 V to +8 V FS Range)
15.8
16
16.2
15.8
16
16.2
k
Pin 10 to Pin 5 (Auxiliary Input)
19.8
20
20.2
19.8
20
20.2
k
Temperature Coefficient (All)
±50
100
±50
100
ppm/
∞C
INTEGRATOR OP AMP
Input Bias Current
Inverting Input (Pin 5)
±5
20
±5
20
nA
Noninverting Input (Pin 6)
20
50
20
50
nA
Input Offset Current
20
70
20
70
nA
Input Offset Current Drift
1
3
1
2
nA/
∞C
Input Offset Voltage
±1
3
±1
2
mV
Input Offset Voltage Drift
±10
±25
±10
±15
µV/∞C
Open Loop Gain
86
86
dB
Common-Mode Input Range
≠V
S
+ 5
+V
S
≠ 5
≠V
S
+ 5
+V
S
≠ 5
V
CMRR
80
80
dB
Bandwidth
14
95
14
95
MHz
Output Voltage Range
≠1
(+V
S
≠ 4)
≠1
(+V
S
≠ 4) V
(Referred to Pin 6, R1 > = 5k)
COMPARATOR
Input Bias Current
0.5
5
0.5
5
µA
Common-Mode Voltage
≠V
S
+ 4
+ V
S
≠ 4
≠V
S
+ 4
+V
S
≠ 4
V
CLOCK INPUT
Maximum Frequency
4
5
4
5
MHz
Threshold Voltage (Referred to Pin 12)
1.2
1.2
V
T
MIN
to T
MAX
0.8
2.0
0.8
2.0
V
Input Current
(≠V
S
<V
CLK
< +V
S
)
5
20
5
20
µA
Voltage Range
≠V
S
+V
S
≠V
S
+V
S
V
Rise Time
2
2
µs
REV. B
≠2≠

AD652
AD652JP/AQ/SQ
AD652KP/BQ
Parameter
Min
Typ
Max
Min
Typ
Max
Units
OUTPUT STAGE
V
OL
(I
OUT
= 10 mA)
0.4
0.4
V
I
OL
V
OL
<0.8 V
15
15
mA
V
OL
<0.4 V, T
MIN
≠T
MAX
8
8
mA
I
OH
(Off Leakage)
0.01
10
0.01
10
µA
Delay Time, Positive Clock Edge to
150
200
250
150
200
250
ns
Output Pulse
Fall Time (Load = 500 pF and I
SINK
= 5 mA)
100
100
ns
Output Capacitance
5
5
pF
OUTPUT ONE-SHOT
Pulsewidth, t
OS
C
OS
= 300 pF
1
1.5
2
1
1.5
2
µs
C
OS
= 1000 pF
4
5
6
4
5
6
µs
REFERENCE OUTPUT
Voltage
4.950
5.0
5.050
4.975
5.0
5.025
V
Drift
100
50
ppm/
∞C
Output Current
Source T
MIN
to T
MAX
10
10
mA
Sink
100
500
100
500
µA
Power Supply Rejection
(Supply Range =
±12.5 V to ±17.5 V)
0.015
0.015
%/V
Output Impedance (Sourcing Current)
0.3
2
0.3
2
POWER SUPPLY
Rated Voltage
±15
±15
V
Operating Range
Dual Supplies
±6
±15
±18
±6
±15
±18
V
Single Supply (≠V
S
= 0)
+12
+36
+12
+36
V
Quiescent Current
±11
15
±11
15
mA
Digital Common
≠V
S
+V
S
≠ 4
≠V
S
+V
S
≠ 4
V
Analog Common
≠V
S
+V
S
≠V
S
+V
S
V
TEMPERATURE RANGE
Specified Performance
JP, KP Grade
0
+70
0
+70
∞C
AQ, BQ Grade
≠40
+85
≠40
+85
∞C
SQ Grade
≠55
+125
∞C
NOTES
1
Referred to internal V
REF
. In PLCC package, tested on 10 V input range only.
Specifications in boldface are 100% tested at final test and are used to measure outgoing quality levels.
Specifications subject to change without notice.
ABSOLUTE MAXIMUM RATINGS
Total Supply Voltage +V
S
to ≠V
S
. . . . . . . . . . . . . . . . . . 36 V
Maximum Input Voltage (Figure 6) . . . . . . . . . . . . . . . . . 36 V
Maximum Output Current (Open Collector Output) . . 50 mA
Amplifier Short Circuit to Ground . . . . . . . . . . . . . Indefinite
Storage Temperature Range: Cerdip . . . . . . ≠65
∞C to +150∞C
Storage Temperature Range:
PLCC . . . . . . ≠65
∞C to +150∞C
DEFINITIONS OF SPECIFICATIONS
GAIN ERROR--The gain of a voltage-to-frequency converter is
that scale factor setting that provides the nominal conversion
relationship, e.g., 1 MHz full scale. The "gain error" is the dif-
ference in slope between the actual and ideal transfer functions
for the V-F converter.
LINEARITY ERROR--The "linearity error" of a V-F is the
deviation of the actual transfer function from a straight line
passing through the endpoints of the transfer function.
GAIN TEMPERATURE COEFFICIENT--The gain tempera-
ture coefficient is the rate of change in full-scale frequency as a
function of the temperature from +25
∞C to T
MIN
or T
MAX
.
REV. B
≠3≠

AD652
REV. B
≠4≠
ORDERING GUIDE
Gain
Drift
Specified
Part
ppm/ C
1 MHz
Temperature
Package
Number
1
100 kHz
Linearity %
Range C
Options
2
AD652JP
50 max
0.02 max
0 to +70
PLCC (P-20A)
AD652KP
25 max
0.005 max
0 to +70
PLCC (P-20A)
AD652AQ
50 max
0.02 max
≠40 to +85
Cerdip (Q-16)
AD652BQ
25 max
0.005 max
≠40 to +85
Cerdip (Q-16)
AD652SQ
50 max
0.02 max
≠55 to +125
Cerdip (Q-16)
NOTES
1
For details on grade and package offerings screened in accordance with MIL-
STD-883, refer to the Analog Devices Military Products Databook or current
AD652/883 data sheet.
2
P = Plastic Leaded Chip Carrier; Q = Cerdip.
PIN CONFIGURATIONS
PIN
Q-16 PACKAGE
P-20A PACKAGE
1
+V
S
NC
2
TRIM
+V
S
3
TRIM
NC
4
OP AMP OUT
OP AMP OUT
5
OP AMP "--"
OP AMP "--"
6
OP AMP "+"
OP AMP "+"
7
10 VOLT INPUT
5 VOLT INPUT
8
≠V
S
10 VOLT INPUT
9
C
OS
8 VOLT INPUT
10
CLOCK INPUT
OPTIONAL 10 V INPUT
11
FREQ OUT
≠V
S
12
DIGITAL GND
C
OS
13
ANALOG GND
CLOCK INPUT
14
COMP "--"
FREQ OUT
15
COMP "+"
DIGITAL GROUND
16
COMP REF
ANALOG GND
17
COMP "--"
18
COMP "+"
19
NC
20
COMP REF
THEORY OF OPERATION
A synchronous VFC is similar to other voltage-to-frequency
converters in that an integrator is used to perform a charge-
balance of the input signal with an internal reference current.
However, rather than using a one-shot as the primary timing
element which requires a high quality and low drift capacitor,
a synchronous voltage-to-frequency converter (SVFC) uses an
external clock; this allows the designer to determine the system
stability and drift based upon the external clock selected. A crys-
tal oscillator may also be used if desired.
The SVFC architecture provides other system advantages besides
low drift. If the output frequency is measured by counting
pulses gated to a signal which is derived from the clock, the
clock stability is unimportant and the device simply performs as a
voltage controlled frequency divider, producing a high resolution
A/D. If a large number of inputs must be monitored simulta-
neously in a system, the controlled timing relationship between
the frequency output pulses and the user supplied clock greatly
simplifies this signal acquisition. Also, if the clock signal is pro-
vided by a VFC, then the output frequency of the SVFC will be
proportional to the product of the two input voltages.
Hence, multiplication and A-to-D conversion on two signals are
performed simultaneously.
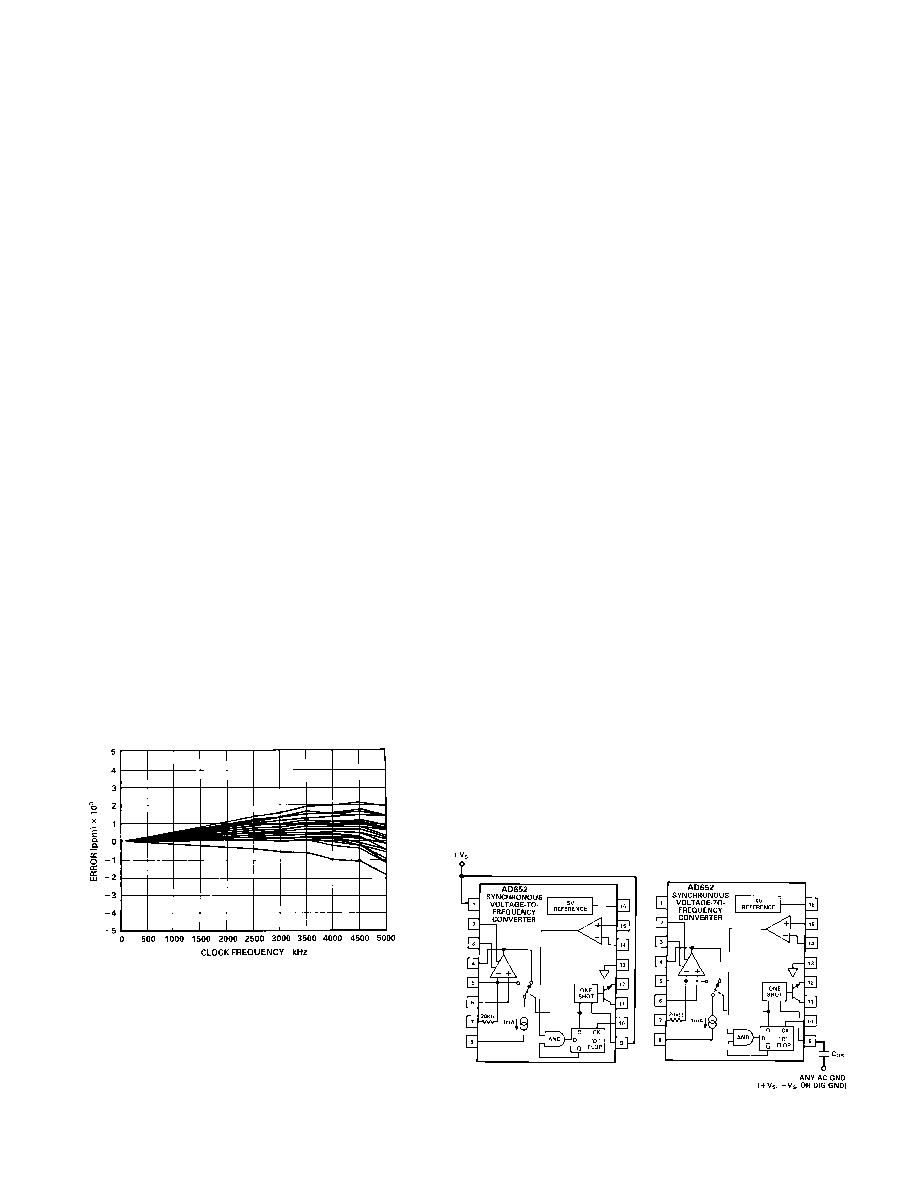
Figure 1a. Cerdip Pin Configuration
The pinouts of the AD652 SVFC are shown in Figure 1. A
block diagram of the device configured as a SVFC, along with
various system waveforms, is shown in Figure 2.
Figure 1b. PLCC Pin Configuration
Figure 2 shows the typical up-and-down ramp integrator output
of a charge-balance VFC. After the integrator output has crossed
the comparator threshold and the output of the AND gate has
gone high, nothing happens until a negative edge of the clock
comes along to transfer the information to the output of the
D-FLOP. At this point, the clock level is low, so the latch does
not change state. When the clock returns high, the latch output
goes high and drives the switch to reset the integrator. At the
same time the latch drives the AND gate to a low output state.
On the very next negative edge of the clock the low output state
of the AND gate is transferred to the output of the D-FLOP
and then when the clock returns high, the latch output goes low
and drives the switch back into the Integrate Mode. At the same
time the latch drives the AND gate to a mode where it will truth-
fully relay the information presented to it by the comparator.
Since the reset pulses applied to the integrator are exactly one
clock period long, the only place where drift can occur is in a
variation of the symmetry of the switching speed with tempera-
ture. Since each reset pulse is identical to every other, the AD652
SVFC produces a very linear voltage to frequency transfer rela-
tion. Also, since all of the reset pulses are gated by the clock,

AD652
REV. B
≠5≠
there are no problems with dielectric absorption causing the
duration of a reset pulse to be influenced by the length of time
since the last reset.
Figure 2. AD652 Block Diagram and System Waveforms
Referring to Figure 2, it can be seen that the period between
output pulses is constrained to be an exact multiple of the clock
period. Consider an input current of exactly one quarter of the
value of the reference current. In order to achieve a charge bal-
ance, the output frequency will equal the clock frequency divided
by four; one clock period for reset and three clock periods of inte-
grate. This is shown in Figure 3. If the input current is increased by
a very small amount, the output frequency should also increase
by a very small amount. Initially, however, no output change is
Figure 3. Integrator Output for l
IN
= 250
µA
observed for a very small increase in the input current. The out-
put frequency continues to run at one quarter of the clock,
delivering an average of 250
µA to the summing junction. Since
the input current is slightly larger than this, charge accumulates
in the integrator and the sawtooth signal starts to drift downward.
As the integrator sawtooth drifts down, the comparator thresh-
old is crossed earlier and earlier in each successive cycle, until
finally, a whole cycle is lost. When the cycle is lost, the Integrate
Phase lasts for two periods of the clock instead of the usual three
periods. Thus, among a long string of divide-by-fours an occasional
divide-by-three occurs; the average of the output frequency is
very close to one quarter of the clock, but the instantaneous fre-
quency can be very different.
Because of this, it is very difficult to observe the waveform on an
oscilloscope. During all of this time, the signal at the output of
the integrator is a sawtooth wave with an envelope which is also
a sawtooth. This is shown in Figure 4.
Figure 4. Integrator Output for I
IN
Slightly Greater
than 250
µA
Another way to view this is that the output is a frequency of
approximately one quarter of the clock that has been phase
modulated. A constant frequency can be thought of as accumu-
lating phase linearly with time at a rate equal to 2
f radians per
second. Hence, the average output frequency which is slightly in
excess of a quarter of the clock will require phase accumulation
at a certain rate. However, since the SVFC is running at exactly
one quarter of the clock, it will not accumulate enough phase
(see Figure 5). When the difference between the required phase
(average frequency) and the actual phase equals 2
, a step in
phase is taken where the deficit is made up instantaneously. The
output frequency is then a steady carrier which has been phase
modulated by a sawtooth signal (see Figure 5). The period of
the sawtooth phase modulation is the time required to accumulate
a 2
difference in phase between the required average frequency
and one quarter of the clock frequency. The amplitude of the
sawtooth phase modulation is 2
.
Figure 5. Phase Modulation

AD652
REV. B
≠6≠
The result of this synchronism is that the rate at which data may
be extracted from the series bit stream produced by the SVFC is
limited. The output pulses are typically counted during a fixed
gate interval and the result is interpreted as an average frequency.
The resolution of such a measurement is determined by the
clock frequency and the gate time. For example, if the clock fre-
quency is 4 MHz and the gate time is 4.096 ms, then a maximum
count of 8,192 is produced by a full-scale frequency of 2 MHz.
Thus, the resolution is 13 bits.
OVERRANGE
Since each reset pulse is only one clock period in length, the
full-scale output frequency is equal to one-half the clock frequency.
At full scale the current steering switch spends half of the time
on the summing junction; thus, an input current of 0.5 mA can
be balanced. In the case of an overrange, the output of the inte-
grator op amp will drift in the negative direction and the output
of the comparator will remain high. The logic circuits will then
simply settle into a "divide-by-two" of the clock state.
SVFC CONNECTION FOR DUAL SUPPLY, POSITIVE
INPUT VOLTAGES
Figure 6 shows the AD652 connection scheme for the tradi-
tional dual supply, positive input mode of operation. The
±V
S
range is from
±6 volts to ±18 volts. When +V
S
is lower than
9.0 volts, Figure 6 requires three additional connections. The
first connection is to short Pin 13 to Pin 8 (Analog Ground to
≠V
S
) and add a pull-up resistor to +V
S
(as shown in Figure 15).
The pull-up resistor is determined by the following equation:
R
PULLUP
=
2 V
S
≠ 5 V
500
µA
These connections will ensure proper operation of the 5 V
reference. Tie Pin 16 to Pin 6 (as shown in Figure 15) to ensure
that the integrator output ramps down far enough to trip the
comparator.
The cerdip packaged AD652 accepts either a 0 V to 10 V or
0 mA to 0.5 mA full-scale input signal. The temperature drift
of the AD652 is specified for a 0 V to 10 V input range using
the internal 20 k
resistor. If a current input is used, the gain
drift will be degraded by a maximum of 100 ppm/
∞C (the TC of
the 20 k
resistor). If an external resistor is connected to Pin 5
to establish a different input voltage range, drift will be induced
to the extent that the external resistor's TC differs from the TC
of the internal resistor. The external resistor used to establish a
different input voltage range should be selected as to provide a
full-scale current of 0.5 mA (i.e., 10 k
for 0 V to 5 V).
Figure 6. Standard V/F Connection for Positive Input
Voltage with Dual Supply
SVFC CONNECTIONS FOR NEGATIVE INPUT
VOLTAGES
Voltages which are negative with respect to ground may be
used as the input to the AD652 SVFC. In this case, Pin 7 is
grounded and the input voltage is applied to Pin 6 (see Figure
7). In this mode the input voltage can go as low as 4 volts above
≠V
S.
In this configuration the input is a high impedance, and
only the 20 nA (typical) input bias current of the op amp need
be supplied by the input signal. This is contrasted with the more
usual positive input voltage configuration, which has a 20 k
input impedance and requires 0.5 mA from the signal source.
Figure 7. Negative Voltage Input
SVFC CONNECTION FOR BIPOLAR INPUT VOLTAGES
A bipolar input voltage of
±5 V can be accommodated by inject-
ing a 250
µA current into Pin 5. This is shown in Figure 8a. A
≠5 V signal will then provide a zero sum current at the integrator
summing junction which will result in a zero output frequency,
while a +5 V signal will provide a 0.5 mA (full-scale) sum cur-
rent which will result in the full-scale output frequency.
Figure 8a. Bipolar Offset
The use of an external resistor to inject the offset current will
have some effect on the bipolar offset temperature coefficient.
The ideal transfer curve with bipolar inputs is shown in Fig-
ure 8b. The user actually has four options to use in injecting the
bipolar offset current into the inverting input of the op amp: 1)
use an external resistor for R
OS
and the internal 20k resistor for
R
IN
(as shown in Figure 8a); 2) use the internal 20k resistor as
R
OS
and an external R
IN
; 3) use two external resistors; 4) use
two internal resistors for R
IN
and R
OS
(available on PLCC
version only).

AD652
REV. B
≠7≠
Option #4 provides the closest to the ideal transfer function as
diagrammed in Figure 8b. Figure 8c shows the effects on the
transfer relation of the other three options. In the first case, the
slope of the transfer function is unchanged with temperature.
However, V
ZERO
( the input voltage required to produce an out-
put frequency of 0 Hz) and F
ZERO
(the output frequency when
V
IN
= 0 V) changes as the transfer function is displaced parallel
to the voltage axis with temperature. In the second case, F
ZERO
remains constant, but V
ZERO
changes as the transfer function
rotates about F
ZERO
with temperature changes. In the third case,
with two external resistors, the V
ZERO
point remains invariant
while the slope and offset of the transfer function change with
temperature. If selecting this third option, the user should select
low drift, matched resistors.
Figure 8b. Ideal Bipolar Input Transfer Curve Over
Temperature
Figure 8c. Actual Bipolar Input Transfer Over Temperature
PLCC CONNECTIONS
The PLCC packaged AD652 offers additional input resistors
not found on the cerdip-packaged device. These resistors pro-
vide the user with additional input voltage ranges. Besides the
10 V range available using the on-chip resistor in the cerdip
part, the PLCC device also offers 8 V and 5 V ranges. Figures
9a≠9c show the proper connections for these ranges with posi-
tive input voltages. For negative input voltages, the appropriate
resistor should be tied to analog ground and the input voltage
should be applied to Pin 6, the "+" input of the op amp.
Bipolar input voltages can be accommodated by injecting a
250
µA into Pin 5 with the use of the 5 V reference and the
input resistors. For
±5 V or ±2.5 V range the reference output,
Pin 20, should be tied to Pin 10. The input signal should then
be applied to Pin 8 for a
±5 V signal and Pin 7 for a ± 2.5 V
signal. The input connections for a
± 5 V range are shown in
Figure 9d. For a
±4 V range, the input signal should be applied
to Pin 9, and Pin 20 should be connected to Pin 8.
Figure 9.
GAIN AND OFFSET CALIBRATION
The gain error of the AD652 is laser trimmed to within
±0.5%.
If higher accuracy is required, the internal 20 k
resistor must
be shunted with a 2 M
resistor to produce a parallel equivalent
which is 1% lower in value than the nominal 20 k
. Full-scale
Figure 10a. Cerdip Gain and Offset Trim
Figure 10b. PLCC Gain and Offset Trim
AD652
REV. B
≠8≠
adjustment is then accomplished using a 500
series trimmer.
See Figures 10a and 10b. When negative input voltages are
used, this 500
trimmer will be tied to ground and Pin 6 will
be the input pin.
This gain trim should be done with an input voltage of 9 V, and
the output frequency should be adjusted to exactly 45% of the
clock frequency. Since the device settles into a divide-by-two
mode for an input overrange condition, adjusting the gain with a
10 V input is impractical; the output frequency would be exactly
one-half the clock frequency if the gain were too high and would
not change with adjustment until the exact proper scale factor
was achieved. Hence, the gain adjustment should be done with a
9 V input.
The offset of the op amp may be trimmed to zero with the trim
scheme shown in Figures 10a for the cerdip packaged device and
Figure 10b for the PLCC packaged device. One way of trim-
ming the offset is by grounding Pin 7 (8) of the cerdip (PLCC)
packaged device and observing the waveform at Pin 4. If the off-
set voltage of the op amp is positive, then the integrator will have
saturated and the voltage will be at the positive rail. If the offset
voltage is negative, then there will be a small effective input current
that will cause the AD652 to oscillate and a sawtooth waveform
will be observed at Pin 4. The trimpot should be adjusted until
the downward slope of this sawtooth becomes very slow, down
to a frequency of 1 Hz or less. In an analog-to-digital conversion
application, an easier way to trim the offset is to apply a small
input voltage, such as 0.01% of the full-scale voltage, and adjust
the trimpot until the correct digital output is reached.
GAIN PERFORMANCE
The AD652 gain error is specified as the difference in slope
between the actual and the ideal transfer function over the full-
scale frequency range. Figure 11 shows a plot of the typical
gain error changes vs. the clock input frequency, normalized
to 100 kHz. If after using the AD652 with a full-scale clock
frequency of 100 kHz it is decided to reduce the necessary gat-
ing time by increasing the clock frequency, this plot shows the
typical gain changes normalized to the original 100 kHz gain.
Figure 11. Gain vs. Clock lnput
REFERENCE NOISE
The AD652 has on board a precision buffered 5 V reference
which is available to the user. Besides being used to offset the
noninverting comparator input in the voltage-to-frequency
mode, this reference can be used for other applications such as
offsetting the input to handle bipolar signals and providing
bridge excitation. It can source 10 mA and sink 100
µA, and is
short circuit protected. Heavy loading of the reference will not
change the gain of the VFC, although it will affect the external
reference voltage. For example, a 10 mA load interacting with
a 0.3
typical output impedance will change the reference
voltage by 0.06%.
DIGITAL INTERFACING CONSIDERATIONS
The AD652 clock input is a high impedance input with a
threshold voltage of two diode voltages with respect to Digital
Ground at Pin 12 (approximately 1.2 volts at room temp).
When the clock input is low, 5
µA≠10 µA flows out of this pin.
When the clock input is high, no current flows.
The frequency output is an open collector pull-down and is
capable of sinking 10 mA with a maximum voltage of 0.4 volts.
This will drive 6 standard TTL inputs. The open collector pull
up voltage can be as high as 36 volts above digital ground.
COMPONENT SELECTION
The AD652 integrating capacitor should be 0.02
µF. If a large
amount of normal mode interference is expected (more than
0.1 volts) and the clock frequency is less than 500 kHz, an inte-
grating capacitor of 0.1
µF should be used. Mylar, polypropylene,
or polystyrene capacitors should be used.
The open collector pull-up resistor should be chosen to give
adequately fast rise times. At low clock frequencies (100 kHz)
larger resistor values (several k
) and slower rise times may be
tolerated. However, at higher clock frequencies (1 MHz) a lower
value resistor should be used. The loading of the logic input
which is being driven must also be taken into consideration.
For example, if 2 standard TTL loads are to be driven then a
3.2 mA current must be sunk, leaving 6.8 mA for the pull-up
resistor if the maximum low level voltage is to be maintained at
0.4 volts. A 680
resistor would thus be selected ((5 V≠0.4)V/
6.8 mA) = 680
.
The one-shot capacitor controls the pulse width of the fre-
quency output. The pulse is initiated by the rising edge of the
clock signal. The delay time between the rising edge of the clock
and the falling edge of the frequency output is typically 200 ns.
The width of the pulse is 5 ns/pF and the minimum width is
about 200 ns with Pin 9 floating. If the one-shot period is acci-
dentally chosen longer than the clock period, the width of the
pulse will default to equal the clock period. The one-shot can be
disabled by connecting Pin 9 to +V
S
(Figure 12); the output
pulse width will then be equal to the clock period. The one-shot
is activated (Figure 13) by connecting a capacitor from Pin 9 to
+V
S
, ≠V
S
, or Digital Ground (+V
S
is preferred).
Figure 12. One Shot
Disabled
Figure 13. One Shot
Enabled

AD652
REV. B
≠9≠
DIGITAL GROUND
Digital Ground can be at any potential between ≠V
S
and (+V
S
≠4 volts). This can be very useful in a system with derived
grounds rather than stiff supplies. For example, in a small iso-
lated power circuit, often only a single supply is generated and
the "ground" is set by a divider tap. Such a ground cannot
handle the large currents associated with digital signals. With
the AD652 SVFC, it is possible to connect the DIG GND to
≠V
S
for a solid logic reference, as shown in Figure 14.
Figure 14. Digital GND at ≠V
S
SINGLE SUPPLY OPERATION
In addition to the Digital Ground being connected to ≠V
S
, it is also
possible to connect Analog Ground to ≠V
S
of the AD652. Hence,
the device is truly operating from a single supply voltage that can
range from +12 V to +36 V. This is shown in Figure 15 for a
positive voltage input and Figure 16 for a negative voltage input.
In Figure 15, the comparator reference is used as a derived
ground, and the input voltage is referred to this point as well as
the op amp common mode (Pin 6 is tied to Pin 16). Since the
input signal source must drive 0.5 mA of full-scale signal cur-
rent into Pin 7, it must also draw the exact same current from
the input reference potential. This current will thus be provided
by the 5 V reference.
Figure 15. Single Supply Positive Voltage Input
In the single supply operation mode, an external resistor,
R
PULLUP
, is necessary between the power supply, + V
S
, and the
5 V reference output. This resistor should be selected such that
a current of approximately 500
µA flows during operation. For
example, with a power supply voltage of +15 V, a 20 k
resistor
would be selected ((15 V≠5 V)/500
µA = 20 k).
Figure 16 shows the negative voltage input configuration for use
of the AD652 in the single supply mode. In this mode the signal
source is driving the "+" input of the op amp which requires
only 20 nA (typical), rather than the 0.5 mA required in the
positive input voltage configuration. The voltage at Pin 6 may
go as low as 4 volts above ground (≠V
S
Pin 8). Since the input
reference is 5.0 volts above ground, this leaves a 1 V window
for the input signal. In order to drive the integrating capacitor
with a 0.5 mA full-scale current, it is necessary to provide an
external 2 k
resistor. This results in a 2 k resistor and a 1 V
input range. The external 2 k
resistor should be a low TC
metal-film type for lowest drift degradation.
Figure 16. Single Supply Negative Voltage Input
FREQUENCY-TO-VOLTAGE CONVERTER
The AD652 SVFC also works as a frequency-to-voltage converter.
Figure 17 shows the connection diagram for F/V conversion. In
this case the "≠" input of the comparator is fed the input pulses.
Either comparator input may be used so that an input pulse of
either polarity may be applied to the F/V.
Figure 17. Frequency-to-Voltage Converter

AD652
REV. B
≠10≠
In Figure 17 the "+" input is tied to a 1.2 V reference and low
level TTL pulses are used as the frequency input. The pulse must
be low on the falling edge of the clock. On the subsequent rising
edge the 1 mA current source is switched to the integrator sum-
ming junction and ramps up the voltage at Pin 4. Due to the action
of the AND gate, the 1 mA current is switched off after only one
clock period. The average current delivered to the summing
junction varies from 0 mA to 0.5 mA; using the internal 20 k
resistor this results in a full-scale output voltage of
10 V at Pin 4.
The frequency response of the circuit is determined by the
capacitor; the ≠3 dB frequency is simply the RC time constant. A
tradeoff exists between ripple and response. If low ripple is desired,
a large value capacitor must be used (1
µF), if fast response is
needed, a small capacitor is used (1 nF minimum).
The op amp can drive a 5 k
resistor load to 10 V, using a 15 V
positive power supply. If a large load capacitance (0.01
µF) must
be driven, then it is necessary to isolate the load with a 50
resistor as shown. Since the 50
resistor is 0.25% of the full
scale, and the specified gain error with the 20 k
resistor is
±0.5%, this extra resistor will only increase the total gain error
to +0.75% max.
The circuit shown is unipolar and only a 0 V to + 10 V output is
allowed. The integrator op amp is not a general purpose op amp,
rather it has been optimized for simplicity and high speed. The
most significant difference between this amplifier and a general
purpose op amp is the lack of an integrator (or level shift) stage.
Consequently, the voltage on the output (Pin 4) must always be
more positive than 1 volt below the inputs (Pins 6 and 7). For
example, in the F-to-V conversion mode, the noninverting input
of the op amp (Pin 6) is grounded which means that the output
(Pin 4) cannot go below ≠1 volt. Normal operation of the circuit
as shown will never call for a negative voltage at the output.
A second difference between this op amp and a general purpose
amplifier is that the output will only sink 1.5 mA to the negative
supply. The only pull-down other than the 1 mA current used for
voltage-to-frequency conversion is a 0.5 mA source. The op amp
will source a great deal of current from the positive supply, and
it is internally protected by current limiting. The output of the op
amp may be driven to within 4 volts of the positive supply when
not sourcing external current. When sourcing 10 mA, the output
voltage may be driven to within 6 volts of the positive supply.
DECOUPLING AND GROUNDING
It is good engineering practice to use bypass capacitors on the
supply-voltage pins and to insert small valued resistors (10
to
100
) in the supply lines to provide a measure of decoupling
between the various circuits in a system. Ceramic capacitors of
0.1
µF to 1.0 µF should be applied between the supply voltage pins
and analog signal ground for proper bypassing on the AD652.
In addition, a larger board level decoupling capacitor of 1
µF to
10
µF should be located relatively close to the AD652 on each
power supply line. Such precautions are imperative in high reso-
lution data acquisition applications where one expects to exploit
the full linearity and dynamic range of the AD652.
Separate digital and analog grounds are provided on the AD652.
The emitter of the open collector frequency output transistor
and the clock input threshold only are returned to the digital
ground. Only the 5 V reference is connected to analog ground.
The purpose of the two separate grounds is to allow isolation
between the high precision analog signals and the digital section
of the circuitry. Much noise can be tolerated on the digital ground
without affecting the accuracy of the VFC. Such ground noise is
inevitable when switching the large currents associated with the
frequency output signal.
At high full-scale frequencies, it is necessary to use a pull-up
resistor of about 500
in order to get the rise time fast enough
to provide well defined output pulses. This means that from a
5 volt logic supply, for example, the open collector output will
draw 10 mA. This much current being switched will cause ring-
ing on long ground runs due to the self inductance of the wires.
For instance, #20 gauge wire has an inductance of about 20 nH
per inch; a current of 10 mA being switched in 50 ns at the end
of 12 inches of 20 gauge wire will produce a voltage spike of
50 mV. The separate digital ground of the AD652 will easily
handle these types of switching transients.
A problem will remain from interference caused by radiation of
electromagnetic energy from these fast transients. Typically, a
voltage spike is produced by inductive switching transients;
these spikes can capacitively couple into other sections of the
circuit. Another problem is ringing of ground lines and power
supply lines due to the distributed capacitance and inductance
of the wires. Such ringing can also couple interference into sensi-
tive analog circuits. The best solution to these problems is proper
bypassing of the logic supply at the AD652 package. A 1
µF to
10
µF tantalum capacitor should be connected directly to the
supply side of the pull-up resistor and to the digital ground, Pin
12. The pull-up resistor should be connected directly to the
frequency output, Pin 11. The lead lengths on the bypass
capacitor and the pull-up resistor should be as short as possible.
The capacitor will supply (or absorb) the current transients, and
large ac signals will flow in a physically small loop through the
capacitor, pull-up resistor, and frequency output transistor. It is
important that the loop be physically small for two reasons: first,
there is less inductance if the wires are short, and second, the
loop will not radiate RFI efficiently.
The digital ground (Pin 12) should be separately connected to
the power supply ground. Note that the leads to the digital
power supply are only carrying dc current. There may be a dc
ground drop due to the difference in currents returned on the
analog and digital grounds. This will not cause a problem. These
features greatly ease power distribution and ground manage-
ment in large systems. Proper technique for grounding requires
separate digital and analog ground returns to the power supply.
Also, the signal ground must be referred directly to analog ground
(Pin 6) at the package. More information on proper grounding
and reduction of interference can be found in Reference 1.
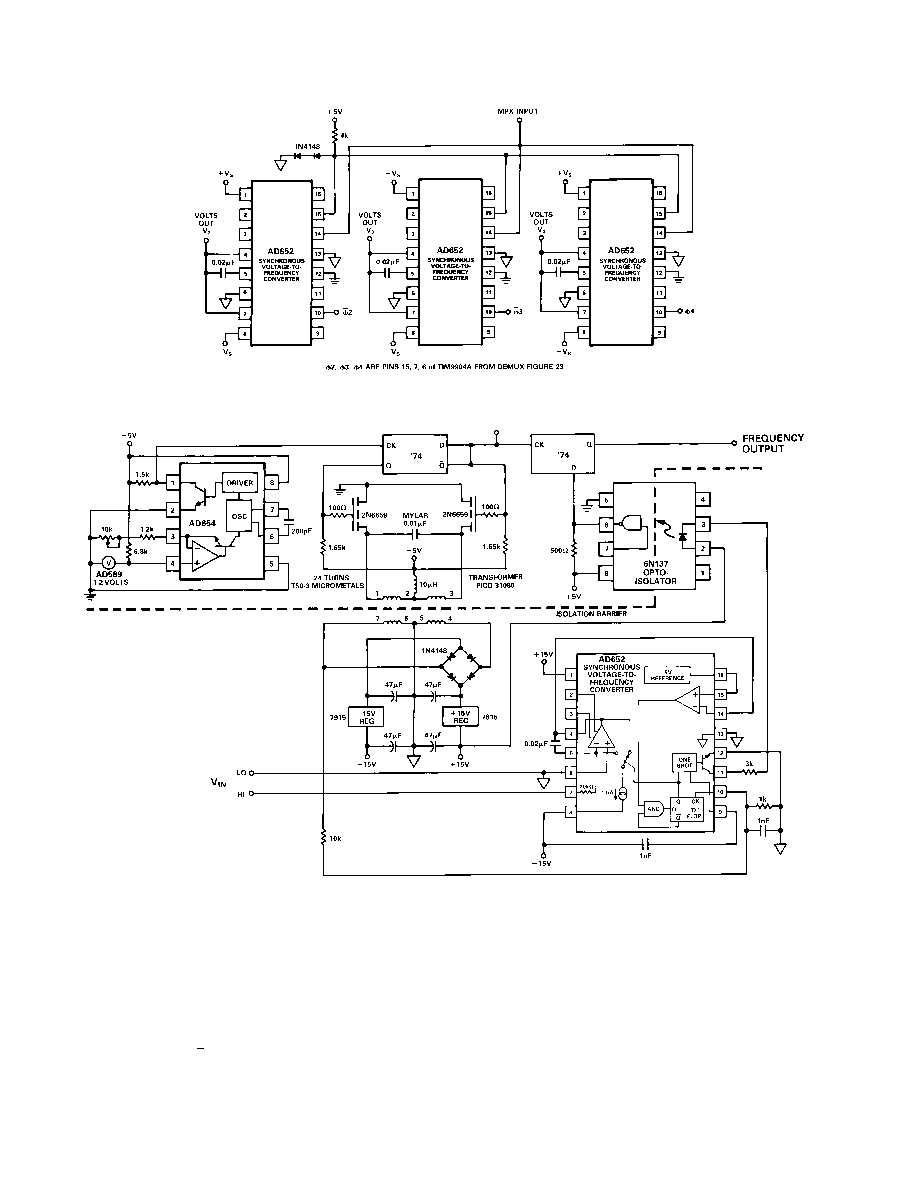
FREQUENCY OUTPUT MULTIPLIER
The AD652 can serve as a frequency output multiplier when
used in conjunction with a standard voltage-to-frequency con-
verter. Figure 18 shows the low cost AD654 VFC being used as
the clock input to the AD652. Also shown is a second AD652
in the F/V mode. The AD654 is set up to produce an output
frequency of 0 kHz≠500 kHz for an input voltage (V
1
) range
of 0 V≠10 V. The use of R4, C1, and the XOR gate doubles this
output frequency from 0 kHz≠500 kHz to 0 MHz≠1 MHz.
1
"Noise Reduction Techniques in Electronic Systems," by H.W. Ort, (John Wiley,
1976).

AD652
REV. B
≠11≠
Figure 18. Frequency Output Multiplier
This can be shown in equation form, where f
C
is the AD654
output frequency and f
OUT
is the AD652 output frequency:
f
C
= V
1
1 MHz
10 V
f
OUT
= V
2
f
C
/2
10 V
f
OUT
= V
1
V
2
1 MHz
2(10 V ) (10 V )
f
OUT
=V
1
∑V
2
∑ 5 kHz/V
2
The scope photo in Figure 19 shows V
1
and V
2
(top two traces)
and the output of the F-V (bottom trace).
Figure 19. Multiplier Waveforms
SINGLE-LINE MULTIPLEXED DATA TRANSMISSION
It is often necessary to measure several different signals and relay
the information to some remote location using a minimum
amount of cable. Multiple AD652 SVFC devices may be used
with a multiphase clock to combine these measurements for
serial transmission and demultiplexing. Figure 20 shows a block
diagram of a single-line multiplexed data transmission system
with high noise immunity. Figures 21, 22 and 23 show the SVFC
multiplexer, a representative means of data transmission, and an
SVFC demultiplexer respectively.
Multiplexer
Figure 21 shows the SVFC multiplexer. The clock inputs for the
several SVFC channels are generated by a TIM9904A four phase
clock driver, and the frequency outputs are combined by strapping
all the frequency output pins together (a "wire or" connection).
The one-shot in the AD652 sets the pulse width of the frequency
output pulses to be slightly shorter than one quarter of the clock
period. Synchronization is achieved by applying one of the four
available phases to a fixed TTL one-shot ('121) and combining
This 1 MHz full-scale frequency is then used as the clock input
to the AD652 SVFC. Since the AD652 full-scale output fre-
quency is one-half the clock frequency, the 1 MHz FS clock
frequency establishes a 500 kHz maximum output frequency for
the AD652 when its input voltage (V
2
) is +10 V. The user thus
has an output frequency range from 0 kHz≠500 kHz which is
proportional to the product of V
1
and V
2
.
Figure 20. Single Line Multiplexed Data Transmission Block Diagram

AD652
REV. B
≠12≠
Figure 21. SVFC Multiplexer
Figure 22. RS-422 Standard Data Transmission
the output with an external transistor. The width of this sync
pulse is shorter than the width of the frequency output pulses to
facilitate decoding the signal. The RC lag network on the input
of the one-shot provides a slight delay between the rising edge
of the clock and the sync pulse in order to match the 150 ns
delay of the AD652 between the rising edge of the clock and
the output pulse.
Transmitter
The multiplex signal can be transmitted in any manner suitable
to the task at hand. A pulse transformer or an opto-isolator can
provide galvanic isolation; extremely high voltage isolation or
transmission through severe RF environments can be accom-
plished with a fiber-optic link; telemetry can be accomplished
with a radio link. The circuit shown in Figure 22 uses an EIA
RS-422 standard for digital data transmission over a balanced
line. Figure 24 shows the waveforms of the four clock phases
and the multiplex output signal. Note that the sync pulse is
present every clock cycle, but the data pulses are no more fre-
quent than every other clock cycle since the maximum output
frequency from the SVFC is half the clock frequency. The clock
frequency used in this circuit is 819.2 kHz and will provide
more than 16 bits of resolution if 100 millisecond gate time is
allowed for counting pulses of the decoded output frequencies.

AD652
REV. B
≠13≠
SVFC Demultiplexer
The demultiplexer needed to separate the combined signals is
shown in Figure 23. A phase locked loop drives another four
phase clock chip to lock onto the reconstructed clock signal.
The sync pulses are distinguished from the data pulses by their
shorter duration. Each falling edge on the multiplex input signal
triggers the one-shot, and at the end of this one-shot pulse the
multiplex input signal is sampled by a D-type flip-flop. If the
signal is high, then the pulse was short (a sync pulse) and the
Q output of the D-flop goes low. The D-flop is cleared a short
time (two gate delays) later, and the clock is reconstructed as a
stream of short, low-going pulses. If the Multiplex input is a
data pulse, then when the D-flop samples at the end of the one-
shot period, the signal will still be low and no pulse will appear
at the reconstructed clock output. These waveforms are shown
in Figure 25.
If it is desired to recover the individual frequency signals, then
the multiplex input is sampled with a D-flop at the appropriate
time as determined by the rising edge of the various phases
generated by the clock chip. These frequency signals can be
counted as a ratio relative to the reconstructed clock, so it is not
even necessary for the transmitter to be crystal controlled as
shown here.
Figure 23. SVFC Demultiplexers
Figure 25. Demultiplexer Waveforms
Figure 24. Multiplexer Waveforms
AD652
REV. B
≠14≠
Figure 26. Demultiplexer Frequency-to-Voltage Conversion
Figure 27. Isolated Synchronous VFC
Analog Signal Reconstruction
If it is desired to reconstruct the analog voltages from the multi-
plex signal, then three more AD652 SVFC devices are used as
frequency-to-voltage converters, as shown in Figure 26. The
comparator inputs of all the devices are strapped together, and
the "+" inputs are held at a 1.2 volt TTL threshold, while the
"≠" inputs are driven by the multiplex input. The three clock
inputs are driven by the
outputs of the clock chip. Remember
that data at the comparator input of the SVFC is loaded on the
falling edge of the clock signal and shifted out on the next rising
edge. Note that the frequency signals for each data channel are
available at the frequency output pin of each FVC.
ISOLATED FRONT END
In some applications it may be necessary to have complete
galvanic isolation between the analog signals being measured and
the digital portions of the circuit. The circuit shown in Figure
27 runs off a single 5 volt power supply and provides a self-
contained, completely isolated analog measurement system. The
power for the AD652 SVFC is provided by a chopper and a
transformer, and is regulated to
±15 volts.
Both the chopper frequency and the AD652 clock frequency are
125 kHz, with the clock signal being relayed to the SVFC through
the transformer. The frequency output signal is relayed through
AD652
REV. B
≠15≠
Table I.
Conversion
or
Resolution
N
Clock
Gate Time
Typ Lin Comments
12 Bits
4096
81.92 kHz
100 ms
0.002%
50, 60, 400 Hz NMR
12 Bits
4096
2 MHz
4.096 ms
0.01%
12 Bits
4096
4 MHz
2.048 ms
0.02%
4 Digits
10000
200 kHz
100 ms
0.002%
50, 60, 400 Hz NMR
14 Bits
16384
327.68 kHz
100 ms
0.002%
50, 60, 400 Hz NMR
14 Bits
16384
1.966 MHz
16.66 ms
0.01%
60 Hz NMR
14 Bits
16384
1.638 MHz
20 ms
0.01%
50 Hz NMR
4 1/2 Digits
20000
400 kHz
100 ms
0.002%
50, 60, 400 Hz NMR
16 Bits
65536
655.36 kHz
200 ms
0.002%
50, 60, 400 Hz NMR
16 Bits
65536
4 MHz
32.77 ms
0.02%
DELTA MODULATOR
The circuit of Figure 29 shows the AD652 configured as a delta
modulator. A reference voltage is applied to the input of the
integrator (Pin 7), which sets the steady state output frequency
at one-half of the AD652 full-scale frequency (1/4 of the clock
frequency). As a 0 V to 10 V input signal is applied to the com-
parator (Pin 15), the output of the integrator attempts to track
this signal. For an input in an idling condition (dc) the output
frequency will be one-half full scale. For positive going signals
the output frequency will be between one-half full scale and full
scale, and for negative going signals the output frequency will be
between zero and one-half full scale. The output frequency will
correspond to the slope of the comparator input signal.
Figure 29. Delta Modulator
Since the output frequency corresponds to the slope of the input
signal, the delta modulator acts as a differentiator. A delta modula-
tor is thus a direct way of finding the derivative of a signal. This
is useful in systems where, for example, a signal corresponding
to velocity exists and it is desired to determine acceleration.
Figure 30 is a scope photo showing a 20 kHz, 0 V to 10 V sine
wave used as the input to the comparator and its ramp-wise
approximation at the integrator output. The clock frequency used
as 2 MHz and the integrating capacitor was 360 pF. Figure 31
shows the same input signal and its ramp-wise approximation,
along with the output frequency corresponding to the derivative
of the input signal. In this case the clock frequency was 50 kHz.
The choice of an integrating capacitor is primarily dictated by
the input signal bandwidth. Figure 32 shows this relationship. It
should be noted that as the value of C
INT
is lowered, the ramp
size of the integrator approximation becomes larger. This can
be compensated for by increasing the clock frequency. The effect
of the clock frequency on the ramp size is demonstrated in
Figures 30 and 31.
an opto-isolator and latched into a D-flop. The chopper frequency
is generated from an AD654 VFC and is frequency divided by two
to develop differential drive for the chopper transistors, and to
ensure an accurate 50 percent duty cycle. The pull-up resistors
on the D-flop outputs provide a well defined high level voltage
to the choppers to equalize the drive in each direction. The 10
µH
inductor in the +5 V lead of the transformer primary is necessary
to equalize any residual imbalance in the drive on each half-
cycle and thus prevent saturation of the core. The capacitor
across the primary resonates the system so that under light load-
ing conditions on the secondary the wave shape will be sinusoidal
and the clock frequency will be relayed to the SVFC. To adjust
the chopper frequency, disconnect any load on the secondary
and tune the AD654 for a minimum in the supply current drawn
from the 5 volt supply.
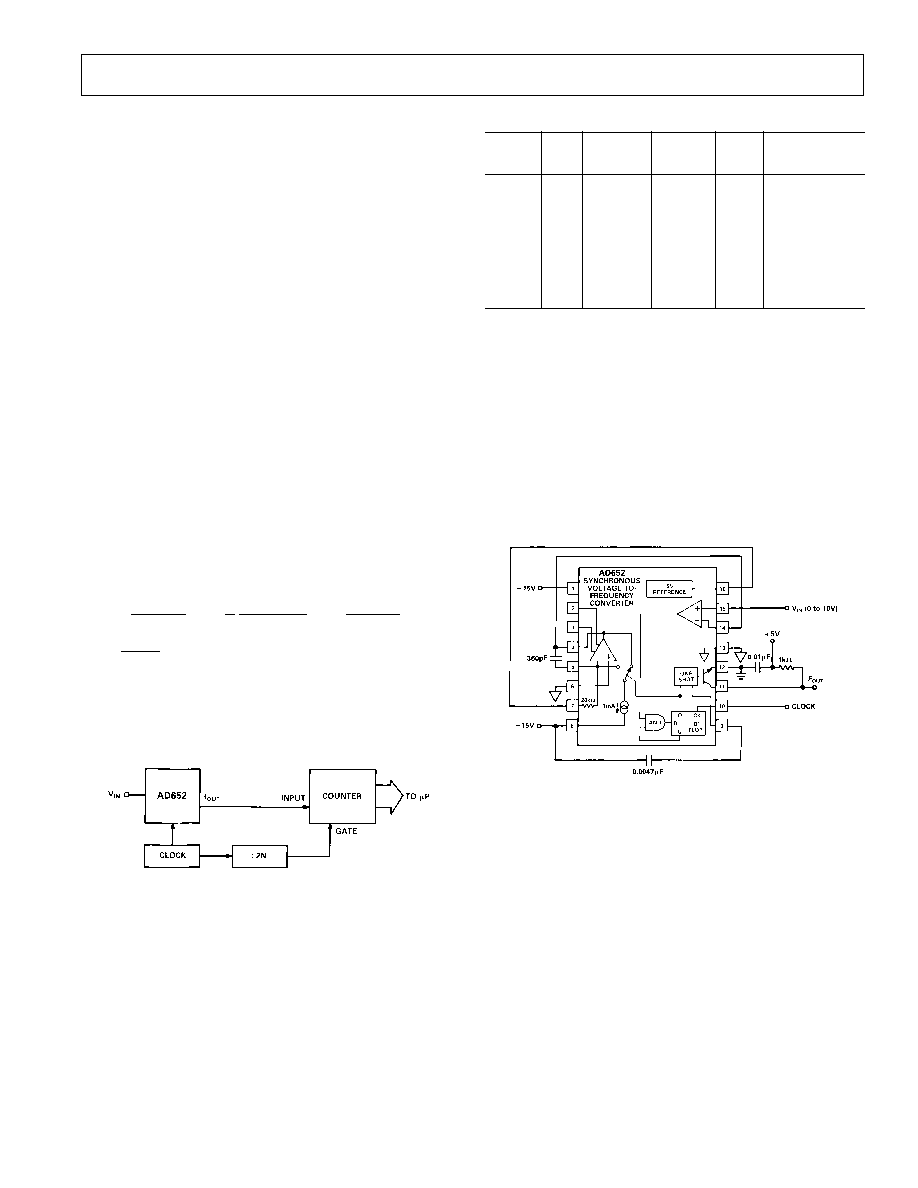
A-TO-D CONVERSION
In performing an A-to-D conversion, the output pulses of a VFC
are counted for a fixed gate interval. To achieve maximum per-
formance with the AD652, the fixed gate interval should be
generated using a multiple of the SVFC clock input. Counting
in this manner will eliminate any errors due to the clock (whether it
be jitter, drift with time or temperature, etc.) since it is the ratio
of the clock and output frequencies that is being measured.
The resolution of the A-to-D conversion measurement is deter-
mined by the clock frequency and the gate time. If, for instance,
a resolution of 12 bits is desired and the clock frequency is 1 MHz
(resulting in an AD652 FS frequency of 500 kHz) the gate time
will be:
FS Freq
N
≠1
= 1
2
Clock Freq
N
≠1
=
1 MHz
2(4096 )
≠1
= 8192
1
◊10
6
sec
= 8.192 ms :
Where N is the
total number of
codes for a given
resolution.
Figure 28 shows the AD652 SVFC as an A-to-D converter in
block diagram form.
Figure 28. Block Diagram of SVFC A-to-D Converter
To provide the
˜ 2N block a single chip counter such as the
4020B can be used. The 4020B is a 14-stage binary ripple
counter which has a clock and master reset for inputs, and buff-
ered outputs from the first stage and the last eleven stages. The
output of the first stage is f
CLOCK
˜ 2
1
= f
CLOCK
/2) while the
output of the last stage is f
CLOCK
˜ 2
14
= f
CLOCK
/16384. Hence
using this single chip counter as the
˜ 2N block, 13-bit resolu-
tion can be achieved. Higher resolution can be achieved by
cascading D-type flipflops or another 4020B with the counter.
Table I shows the relationship between clock frequency and gate
time for various degrees of resolution. Note that if the variables
are chosen such that the gate times are multiples of 50 Hz, 60 Hz
or 400 Hz, normal-mode rejection (NMR) of those line fre-
quencies will occur.

AD652
REV. B
≠16≠
C1049b
≠
0
≠
2/00 (rev. B)
Figure 30. Delta Modulator lnput Signal and Ramp-Wise
Approximation
Figure 31. Delta Modulator Input Signal, Ramp-Wise
Approximation and Output Frequency
Figure 32. Maximum Integrating Cap Value vs. Input
Signal Bandwidth
BRIDGE TRANSDUCER INTERFACE
The circuit of Figure 33 illustrates a simple interface between
the AD652 and a bridge-type transducer. The AD652 is an
ideal choice because its buffered 5 volt reference can be used as
the bridge excitation thereby ratiometrically eliminating the gain
drift related errors. This reference will provide a minimum of
10 mA of external current, which is adequate for bridge resis-
tance of 600
and above. If, for example, the bridge resistance
is 120
or 350 , an external pull-up resistor (R
PU
) is required
and can be calculated using the formula:
R
PU
(max )
=
+V
S
≠ 5 V
5 V
R
BRIDGE
≠ 10 mA
An instrumentation amplifier is used to condition the bridge sig-
nal before presenting it to the SVFC. The AD625, with its high
CMRR, minimizes common-mode errors and also can be set to
arbitrary gains between 1 and 10,000 via three resistors, simpli-
fying the scaling for the AD652's calibrated 10 volt input range.
These resistors should be selected such that the following equa-
tion holds:
10 V
= V
BRIDGE
2 R
F
R
G
+1
where 10 k
R
F
20 k, and V
BRIDGE
is the maximum
output voltage of the bridge.
The bridge output may be unipolar, as is the case for most
pressure transducers, or it may be bipolar as in some strain mea-
surements. If the signal is unipolar, the reference input of the
AD625 (Pin 7) is simply grounded. If the bridge has a bipolar
output, however, the AD652 reference can be tied to Pin 7,
thereby, converting a
±5 volt signal (after gain) into a 0 volt to
+10 volt input for the SVFC.
Figure 33. Bridge Transducer Interface
OUTLINE DIMENSIONS
Dimensions shown in inches and (mm).
Cerdip
(Q-16)
16
1
8
9
0.310 (7.87)
0.220 (5.59)
PIN 1
0.005 (0.13) MIN
0.080 (2.03) MAX
SEATING
PLANE
0.023 (0.58)
0.014 (0.36)
0.200 (5.08)
MAX
0.840 (21.34) MAX
0.150
(3.81)
MIN
0.070 (1.78)
0.030 (0.76)
0.200 (5.08)
0.125 (3.18)
0.100
(2.54)
BSC
0.060 (1.52)
0.015 (0.38)
15∞
0∞
0.320 (8.13)
0.290 (7.37)
0.015 (0.38)
0.008 (0.20)
PLCC
(P-20A)
3
PIN 1
IDENTIFIER
4
19
18
8
9
14
13
TOP VIEW
(PINS DOWN)
0.395 (10.02)
0.385 (9.78)
SQ
0.356 (9.04)
0.350 (8.89)
SQ
0.048 (1.21)
0.042 (1.07)
0.048 (1.21)
0.042 (1.07)
0.020
(0.50)
R
0.050
(1.27)
BSC
0.021 (0.53)
0.013 (0.33) 0.330 (8.38)
0.290 (7.37)
0.032 (0.81)
0.026 (0.66)
0.180 (4.57)
0.165 (4.19)
0.040 (1.01)
0.025 (0.64)
0.056 (1.42)
0.042 (1.07)
0.025 (0.63)
0.015 (0.38)
0.110 (2.79)
0.085 (2.16)
PRINTED IN U.S.A.